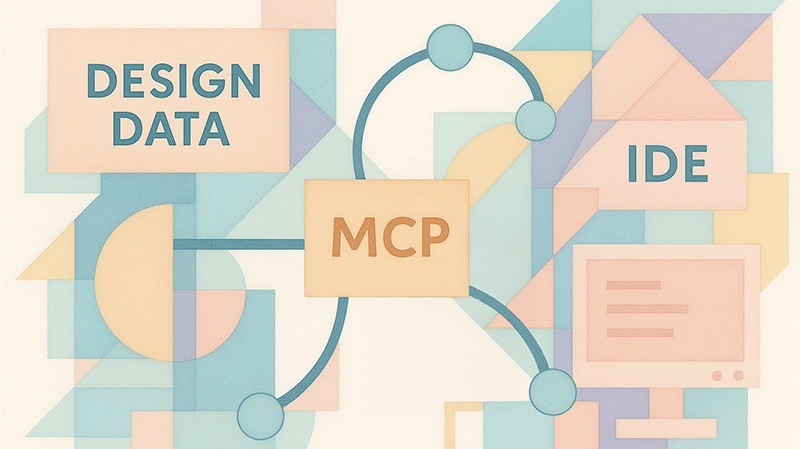
A MCP Server Acting as a Bridge between Design and Development
How to Build a MCP Server: A Practical Guide for Developers
 Gareth Cull
- What is Model Context Protocol? The Model Context Protocol (MCP) is an open standard that defines how applications can provide tools and context to Large Language Models (LLMs).
- What can I learn from reading this article? In this article, you'll learn how to build a simple MCP server that can act as a bridge between two systems. I'll walk through a simple, pure python example built on top of Flask and explain my particular use case and how you can modify it for your own purposes.
- Are there any pre-requisites for this article? This guide is designed for developers, data engineers, and technical product managers who want to learn how to connect business services with AI Agents using MCP. You should have basic familiarity with LLMs, Python, creating APIs, and some experience building with Flask. If you're looking to move beyond simple chatbots to creating AI agents that can access business services, this article may be for you.
Introduction
Most LLMs still live on the sidelines of our workflows.
We copy, paste, and shuffle results between tools. But what if, instead of just moving work around, we could enhance our workflows by building a bridge that connects our tools directly with AI?
That’s exactly what the Model Context Protocol (MCP) makes possible. MCP is a new standard that allows AI assistants to plug directly into the tools we use every day. Whether that’s an IDE, a design platform, or your favourite prototyping tool; MCP enables seamless, AI-powered integration right where the work happens.
In practical terms, this unlocks some game‑changing scenarios.
Imagine a designer building a prototype to tackle a specific problem. When they hit save, it’s immediately available to the team. A developer uses their AI assistant to pull it into the IDE and starts turning the idea into production‑ready code. No platform logins or copy‑paste. Just import and build. The workflow becomes continuous, with AI acting as a bridge between design and development.
I for one am truly excited about this idea and its formed the foundation of my first MCP server. And in this post, I’ll walk you through how I built it to improve my workflow and the workflow of my customers. And along the way, I’ll share some lessons learned, explain how MCP differs from a typical API, and demonstrate how this integration can shift the way we think about design‑to‑development hand-offs. So, if you’ve ever wondered how to make your tools more accessible to people using AI or how to bring your workflows into the AI era, then this guide may be for you.
Now let’s get started!
Table of Contents
This guide will cover the following:
- What is Model Context Protocol (MCP)?
- Benefits of Building a MCP Server?
- Features of a MCP Server
- How is MCP Different from an API?
- MCP Use Case: A MCP Server to Support Design‑to‑Development Workflows
- Tutorial: How to Build a MCP Server in Python
- How to Connect a MCP Server to Cursor
- Walkthrough: How AI Communicates with a MCP Server
- Conclusion: Why MCP Matters
What is Model Context Protocol?
The Model Context Protocol (MCP) is an open standard that defines how applications can provide tools and context to Large Language Models (LLMs). Think of it as a way to give AI assistants superpowers by enabling them to use and extend the apps we depend on.
Unlike traditional LLMs that sit outside the workflow, MCP makes assistants capable of acting directly inside it. This shift transforms AI from a passive Q&A chatbot into an active problem‑solving agent: one that can access services, take meaningful actions, and become a true working partner in everyday tasks.
MCP was originally developed by Anthropic and recently adopted by OpenAI in their new Responses API, signaling real momentum toward a shared standard. By supporting MCP, both ecosystems are laying the groundwork for an open, interoperable AI future where assistants can connect to any tool in a consistent way. No proprietary integrations, no locked‑in silos.
In simple terms, MCP allows you to:
- Expose your application's functionality as "tools" that AI Agents can discover and use
- Let AI assistants interact with your service on behalf of users
- Create seamless, AI‑native integrations between your application and the broader ecosystem
As more providers adopt MCP, this standard will make it dramatically easier for developers to bring their applications into AI workflows. Whether it’s a platform like this one, a data service, or your favourite IDE. Instead of inventing custom ways to “talk” to each assistant, developers can implement MCP once, and every MCP‑compatible AI knows how to use your service.
Benefits of Building a MCP Server
So, why should you consider building a MCP server for your own application? Beyond the curiosity of experimenting with a new protocol, there are some very real advantages that make this worth your time: :
- Enhanced User Experience: Your users no longer need to leave their workflow. Instead of bouncing between tools, they can stay focused while AI acts as the connector in the background.
- AI-Native Integration: Your service becomes first‑class in the AI ecosystem. Tools like Cursor, ChatGPT, and Claude can discover and use your functionality natively
- Reduced Friction: Users don’t have to learn new commands or UI patterns. They simply ask their assistant in natural language, and your service “just works.”
- Increased Adoption: Every MCP‑compatible assistant is now a potential gateway to your application. That means more usage in more places without reinventing integrations for each platform
- Future-Ready: AI assistants are only going to become more common. By supporting MCP, you position your app or service for the next wave of AI‑native workflows.
In other words, building a MCP server isn’t just about connecting to one assistant today. It’s about making your tool accessible across an emerging ecosystem tomorrow. As more platforms adopt the protocol, the value compounds and your app becomes part of a much larger workflow network.
Features of a MCP Server
While the benefits of MCP are clear, it’s also important to understand what the protocol is actually capable of. When a MCP server connects with a LLM client or AI Agent, it shares its set of capabilities, which are essentially the tools that AI assistants can discover and interact with.
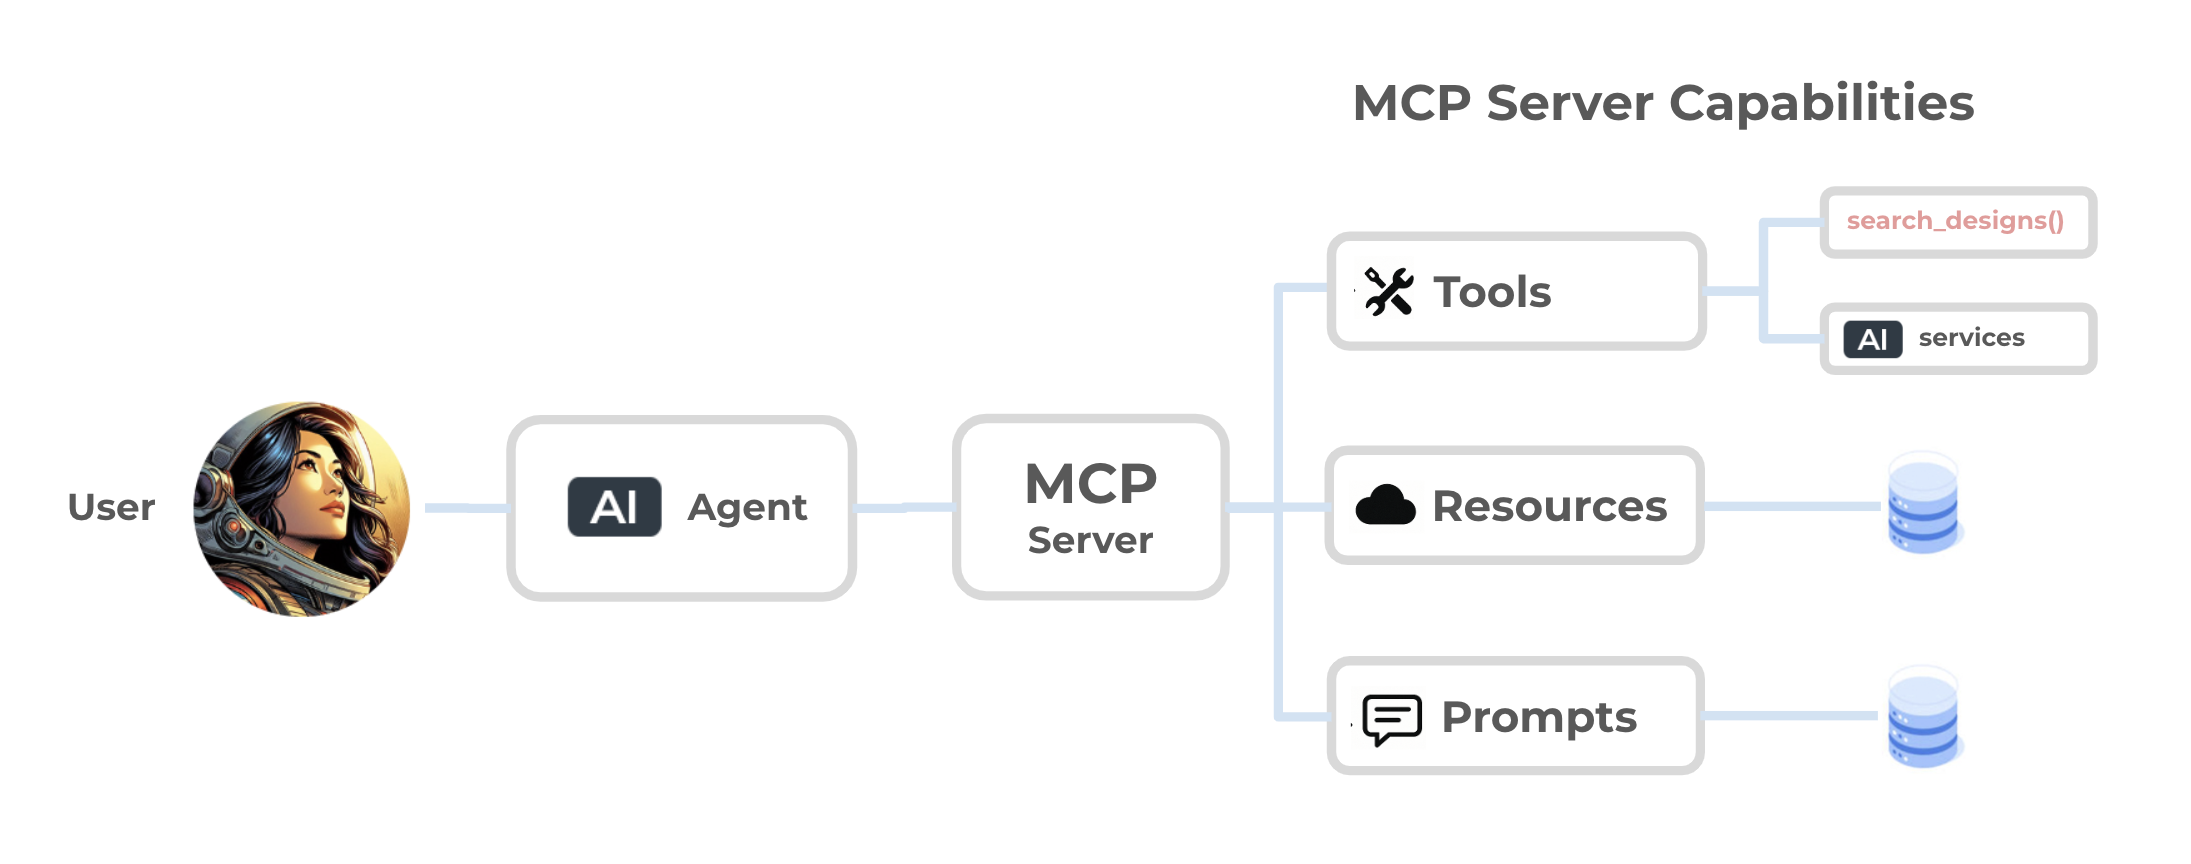
An MCP Server initializing the connection with an agent and sharing capabilities.
The core capabilities MCP provides are:
- Tools: These are functions or actions your application exposes to AI. For example,
search_designsmight let an assistant retrieve designs from a marketplace, while another tool pulls in your latest customer feedback. - Resources: Represents the data your application makes available. Resources can expose content like documentation or real‑time project data. They serve as a context layer that assistants can pull from to stay informed.
- Prompts: These give assistants structured ways to interact with your application through templates or guided inputs. For example, a prompt might define how an assistant frames a question to your service. Including prompts can make interactions more consistent and reduce ambiguity.
Put together, these capabilities turn your app into something AI can not just query, but actively use. A MCP server starts by declaring what it supports (tools, resources, prompts), and from there, any compatible assistant knows exactly how to connect and interact with it.
One of the most exciting things about MCP is its extensibility. You don’t have to support everything at once. You can start with a single tool and later add resources or prompts as your service evolves. This makes MCP lightweight to adopt and powerful to grow with over time.
How is MCP Different from an API?
One of the biggest “aha” moments I had when learning MCP comes from realizing that it’s fundamentally different from a typical REST API. At first glance, you might think building an MCP server is just like exposing new API endpoints...but MCP does a lot more, and it changes how assistants interact with your app.
With a REST API, the pattern is simple: a client makes a request, and the server sends back a response. It’s a one‑to‑one interaction.
With MCP, that interaction looks more like a conversation, mediated by the AI assistant. Your application isn’t talking directly to the user. It’s actually talking through the assistant, which manages multiple rounds of requests and responses on the user’s behalf.
Here’s a simplified comparison:
| Feature | Traditional API | MCP |
|---|---|---|
| Interaction Model | One request → one response | Ongoing conversation with multiple requests |
| Who Calls It? | User’s client (browser, app, script) | The AI Agent makes calls on behalf of the user |
| Discovery | Users manually read docs to learn API | Automatically shares capabilities via Agent |
| Context | Each call is isolated | Persistent context with tools + resources + prompts |
Think of it this way...
APIs expose “endpoints” that people can hit and receive a deterministic response. MCP exposes capabilities (ie. tools, resources, and prompts) that assistants can discover, understand, and then use as part of a larger workflow. Your app doesn’t just answer a question once, but actively participates in a conversation managed by the assistant, across multiple steps and contexts.
MCP Use Case: A MCP Server to Support Design‑to‑Development Workflows
So far, we’ve talked about why MCP matters and how it works. But what does it actually look like when you put it into a real workflow? This is where the magic really starts to happen.
One of the most important collaboration points in product development is the handoff between design and development. Designers work in tools like Figma or prototypr.ai, creating user experiences that communicate structure, flow, and layout. Developers, meanwhile, live inside their IDEs...working with code, APIs, and frameworks. The space between those two worlds has traditionally been filled with exported files, communicating specifications, and a long chain of copy‑paste tasks.
This is exactly the type of workflow gap that a MCP server can help support. By acting as a bridge, MCP enables an AI assistant to connect design data with a developer's environment. Designers can save prototypes in their design tool, and developers can import them into their IDE with a simple natural language request. No exports. No logging into another platform. Just ask the Assistant and receive the prototype.
But here’s where the real shift happens.
What used to take days or weeks can now happen in hours. Prototypes don’t need to be pixel‑perfect or fully branded from the start. They only need to capture functionality and layout. MCP lets the AI handle refinement later, freeing designers to focus on what really matters:
- User flows and how people move through the product
- Information architecture: how content and interactions are structured
- Core behaviors: the fundamentals that define usability
Meanwhile, developers can rely on AI assistants inside their IDEs to apply polish through natural language prompts such as:
- "Update this design to match our brand guidelines from this file"
- "Make this dashboard mobile‑responsive"
- "Replace the placeholder data with API calls to our backend using this function"
Key Insight: MCP doesn’t remove pixel perfection, it reframes it.
By plugging AI into existing design systems, IDE assistants in tools like Cursor can start to apply brand guidelines, colors, typography, and accessibility rules. Designers still have the final say and can apply the human touch that only a designer’s expertise can bring. But, now polish happens at the right time, under the right context, and without slowing down early prototyping.
With MCP, workflows shift from an obsession with polishing early artifacts to building better user experiences faster. Designers become freer to think in terms of flows and usability, while developers (guided by AI) take on the first draft of polish and integration using existing design systems. This turns the design-development handoff into a continuous, collaborative loop where each role focuses on its strengths, and AI bridges the gap in between.
Building a Simple MCP Server in Python
Now that we’ve covered why MCP matters and how it differs from traditional APIs, let’s get practical and build a simple MCP server in Python with Flask.
When I started experimenting with MCP, I wanted to build one with no abstractions or using modules like FastMCP. I wanted to understand how MCP works in its simplest terms using only Flask. I wanted something that was easy to understand while being functional and form the foundation of a proper tool later.
This demo is exactly that: clean, minimal code that handles the basics of MCP (initialize, tools/list, tools/call) without hiding anything. The idea is that once the skeleton works, you can easily swap the placeholder logic with calls to your own services. So, for the example mcp server that we are going to build, i'm going to create a basic search_design tool that an OpenAI or Cursor Client can interact with. This scaffholding later formed the foundation of my production MCP Server that helps prototypr.ai members export designs from their prototypr.ai workspace.
How this MCP Tutorial is Structured
This tutorial is organized into 4 key parts:
- The OpenAI MCP Client: where we'll add our MCP endpoint to enable the client to talk to the MCP server.
- Building a MCP Endpoint in Flask to handle requests from OpenAI's client
- Building a MCP Helper File to store all of the functions and tools we will be exposing to the OpenAI MCP client.
- Connecting a MCP Server to Cursor to test the bridge between design and development
Now that we have an action plan, let's take a look at customizing the OpenAI MCP Client.
The OpenAI MCP Remote Client
If you have worked with the OpenAI Chat Completions API or the Responses API, this should look very familiar.
The key difference being you are going to be adding a tool to the request, which contains information about the MCP server that we will be connecting to. For this tutorial, I'm going to use a prototypr.ai mcp url, but should feel free to change it to your own MCP endpoint.
Here is what the OpenAI Responses API with a custom MCP endpoint looks like:
import requests
import os

OPENAI_API_KEY = os.getenv("OPENAI_API_KEY")

# You can replace server_url and server_label with your own mcp url and name
response = requests.post(
    "https://api.openai.com/v1/responses",
    headers={
        "Content-Type": "application/json",
        "Authorization": f"Bearer {OPENAI_API_KEY}"
    },
    json={
        "model": "gpt-4.1",
        "tools": [{
            "type": "mcp",
            "server_url": "https://www.prototypr.ai/mcp-test",
            "server_label": "prototypr"
        }],
        "input": "Search for dashboard designs"
    }
)

print(response.json())
One important thing to note is that this endpoint is wide open for demo purposes. It doesn't have any authentication tied to it, so if you are working with any data that lives behind an auth, you can secure your endpoint with an API key using the following headers in tools:
"tools": [
    {
      "type": "mcp",
      "server_label": "prototypr",
      "server_url": "https://www.prototypr.ai/mcp-test",
      "headers": {
        "Authorization": "Bearer $PROTOTYPR_API_KEY"
      }
    }
]
You can also pass parameters in those headers should your MCP endpoint requires any additional data to properly authenticate a request (eg. "X-User-Id": user_id).
If you are interested in going deeper into OpenAI's Remote MCP Client, and I encourage that you do, please visit OpenAI's MCP Remote Server documentation. It's super helpful!
Next up, let's create the /mcp-test endpoint in Flask. I called it /mcp-test here just to distinguish the demo, but you could name this endpoint whatever you want upon deployment. For my production MCP endpoint, I use /mcp.
---
The MCP Endpoint in Flask
At the center of this server is a Flask route that listens for /mcp-test POST requests. This function is the entry point for every MCP interaction and looks like this:
from flask import Flask, request, jsonify
import mcp_helper

app = Flask(__name__)

@app.route('/mcp-test', methods=['POST'])
def mcp_endpoint():
    """MCP endpoint to handle JSON-RPC requests"""
    request_id = None
    try:
        data = request.get_json(force=True)
        method = data.get("method")
        params = data.get("params", {})
        request_id = data.get("id")

        # Add AUTH here to secure this endpoint, before delegating to mcp_helper

        # Delegate to MCP helper
        result = mcp_helper.handle_request(method, params)

        return jsonify({
            "jsonrpc": "2.0",
            "result": result,
            "id": request_id
        }), 200

    except Exception as e:
        return jsonify({
            "jsonrpc": "2.0",
            "error": {
                "code": -32603,
                "message": f"Internal error: {str(e)}"
            },
            "id": request_id
        }), 200

if __name__ == "__main__":
    app.run()
Here is what this MCP endpoint does:
- Receives All MCP Requests: Every interaction (whether initialize, tools list, or tools call) comes in as a POST request to
/mcp-testfrom the OpenAI or Cursor Client. - Extracts Method and Params: The incoming request includes a method (like
initialize) and any params. We grab those here and pass them into a helper function to properly route the request.. - Delegates to Helper Function: Instead of bloating this route, it calls
mcp_helper.handle_request, which decides how to respond depending on the method. - Returns a Response to the Client in JSON-RPC format
This design keeps the Flask side very lightweight, so it’s easy to extend later. For example, we could add authentication by verifying a header/token before delegating to mcp_helper. This would ensure that authorized requests can reach your data.
Now that we've built the mcp endpoint, let's dive into and unpack our mcp_helper functions, which I've saved in a separate mcp_helper.py file.
---
Reviewing the MCP Helper Functions: Initialize → Tools List → Tools Call
Before we walk step‑by‑step through how the server responds, I thought it would be helpful to share the complete mcp_helper.py file. This is the core logic that powers our MCP server. It includes everything from the initialization handshake to listing tools and then executing a tool call.
For simplicity and brevity, I am not including Resources or Prompts as part of this tutorial. So feel free to add those in as you grow your MCP server's capabilities.
def handle_request(method, params):
    """Route incoming MCP requests to the right handler based on method name"""
    if method == 'initialize':
        return handle_initialize()
    elif method == 'tools/list':
        return handle_tools_list()
    elif method == 'tools/call':
        return handle_tool_call(params)
    else:
        raise ValueError(f"Method not found: {method}")


def handle_initialize():
    """
    Handles the 'initialize' request from the MCP client.
    This is the first step in the handshake.
    Responds with protocol version, server metadata, and capabilities.
    """
    return {
        "protocolVersion": "2024-11-05",   # Must EXACTLY match published version
        "serverInfo": {
            "name": "prototypr",
            "version": "0.1.0"
        },
        "capabilities": {
            # This demo only supports tools, but MCP also supports resources & prompts
            "tools": {}
        }
    }


def handle_tools_list():
    """
    Handles the 'tools/list' request.
    Returns a catalog of all tools this MCP server exposes.
    Each tool includes its name, description, and expected input schema.
    """
    return {
        "tools": [
            {
                "name": "search_designs",  # Tool identifier
                "description": "Search for designs by title or description from prototypr.ai",
                "inputSchema": {
                    "type": "object",
                    "properties": {
                        # The tool expects a single string input: "query"
                        "query": {
                            "type": "string",
                            "description": "Search query to find matching designs"
                        }
                    },
                    "required": ["query"],
                    "additionalProperties": False
                }
            }
        ]
    }


def handle_tool_call(params):
    """
    Handles 'tools/call' when the client actually wants to run one of the tools.
    Delegates execution to the correct function (here: search_designs).
    """
    tool_name = params.get('name')
    arguments = params.get('arguments', {})

    if tool_name == 'search_designs':
        return search_designs(arguments)
    else:
        raise ValueError(f"Tool not found: {tool_name}")


def search_designs(arguments):
    """
    Implements the 'search_designs' tool.
    - Extracts the user query (e.g., "dashboard")
    - Searches through designs in our demo dataset
    - Returns either matches or a 'not found' message
    """
    query = arguments.get('query', '').lower()

    # Ensure the user provided a query string
    if not query:
        return {
            "content": [{
                "type": "text",
                "text": "Please provide a search query"
            }]
        }

    # Get demo designs (in a real app, replace with actual DB call)
    designs = get_designs()

    results = []
    # Loop through all designs and match query against titles & descriptions
    for design_id, design in designs.items():
        if (query in design['title'].lower() or query in design['description'].lower()):
            results.append({
                "id": design_id,
                "title": design["title"],
                "description": design["description"],
                "timestamp": design["timestamp"],
                "preview": {
                    # Return just a small snippet of HTML
                    "html_snippet": design["html"][:100] + "...",
                    "prompts_used": len(design["prompts"])
                }
            })

    # If no results found, let the assistant know
    if not results:
        return {
            "content": [{
                "type": "text",
                "text": f"No designs found matching '{query}'"
            }]
        }

    # Format results nicely into a text response
    response_text = f"Found {len(results)} design(s) matching '{query}':\n\n"
    for result in results:
        response_text += f"**{result['title']}** (ID: {result['id']})\n"
        response_text += f"Description: {result['description']}\n"
        response_text += f"Created: {result['timestamp']}\n"
        response_text += f"Prompts used: {result['preview']['prompts_used']}\n\n"

    # Return formatted text back to the assistant
    return {
        "content": [{
            "type": "text",
            "text": response_text.strip()
        }]
    }


def get_designs():
    """
    Demo in-memory dataset of designs.
    In production, replace this with a real database or API call.
    """
    return {
        "design_123": {
            "id": "design_123",
            "title": "Modern Dashboard Layout",
            "description": "A clean, responsive dashboard with sidebar navigation",
            "timestamp": "2024-01-15T10:30:00Z",
            "html": "<div class='dashboard'>...</div>",
            "prompts": ["Create a modern dashboard with sidebar navigation"],
        },
        "design_456": {
            "id": "design_456",
            "title": "Landing Page Hero Section",
            "description": "Eye-catching hero section with CTA buttons",
            "timestamp": "2024-01-16T14:20:00Z",
            "html": "<section class='hero'>...</section>",
            "prompts": ["Create a hero section with gradient background"],
        }
    }
And with that you should be able to deploy and test this code in production. If you'd like to deploy this to Google Cloud, check out this nifty tutorial that can help you Build and Deploy a Remote MCP Server to Google Cloud Run in Under 10 Minutes.
Connecting a MCP Server to Cursor
Earlier, we walked through how to connect to our MCP server using the OpenAI Responses API. That was a useful way to test that our server was working correctly and returning valid responses. But instead of just connecting it to OpenAI, let's plug this into the tools that AI developers are using everyday. This is where Cursor comes in.
Cursor is an AI‑powered IDE built on top of Visual Studio Code. It integrates models directly into your coding environment, letting you not only generate and refine code but also connect to external services via MCP. This matters because it ties directly back to the problem we identified in the beginning: simplifying design handoffs.
Traditionally, designers hand off pixel‑perfect mockups, developers recreate them, and the workflow is slowed down by constant back‑and‑forth. With Cursor + MCP, that entire handoff can be streamlined. A developer can simply ask Cursor using prototypr.ai's MCP: “Import the dashboard design called XYZ from my prototypr.ai workspace” And behind the scenes, it connects to the MCP server, fetches the code for the design, and brings it into the IDE. Developers stay in their flow, designers don’t have to worry about exports, and the assistant handles the translation between the two worlds.
Setting Up Cursor with mcp.json
To add a MCP server to Cursor, you’ll need to update Cursor's mcp.json file that tells the IDE where to find your server and how to connect to it. It should look something like this:
// mcp.json for Cursor
{
  "mcpServers": {
    "prototypr": {
      "url": "https://www.prototypr.ai/mcp-test",
      "displayName": "Prototypr AI",
      "description": "Prototypr AI is a research platform that helps people build, measure and learn faster with leading LLMs.",
      "icon": "https://www.prototypr.ai/static/img/ai_icon_32x32.png",
      "headers": {
        "Authorization": "Bearer API_KEY"
      },
      "transport": "stdio"
    }
  }
}
- prototypr→ The label for your MCP server inside Cursor (can be anything you like).
- url→ The MCP endpoint of your Flask server (https://www.prototypr.ai/mcp-test).
- headers→ Authentication headers. For local demos, you can keep this simple, but in production you’d lock this down with API keys or OAuth
- transport→ standard transport mechanisms for client-server communication.
Then, in Cursor go to: Settings > Tools & Integrations > MCP Tools and you should see your MCP Enabled with the tools listed below like this:
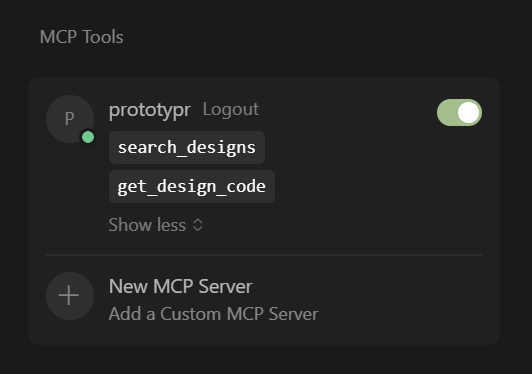
The prototypr.ai MCP server enabled in Cursor Settings
Now you are ready to talk to your MCP server! If you'd like more details about MCP inside of Cursor, please check out Cursor's MCP documentation
Ok, next up, let’s walk through what actually happens when a developer uses it in the context of our problem: bridging the gap between design and code. In this example, the developer is searching for a protopypr.ai prototype inside Cursor.
Walkthrough: Understanding How an LLM Communicates with an MCP Server
Now that we've connected our MCP Server to Cursor, let's imagine a developer asking for the following:
“Search for a dashboard design in prototypr.ai”
Here’s what happens step‑by‑step inside your MCP server, using our coding examples we walked through above.
---
Step 1: Initialize
Cursor first runs an initialize call to see if the MCP server speaks the protocol. This triggers handle_initialize(), which responds with the protocol version, server info, and capabilities.
{
    "protocolVersion": "2024-11-05",
    "serverInfo": {
        "name": "prototypr",
        "version": "0.1.0"
    },
    "capabilities": {
        "tools": {}
    }
}
This is essentially the handshake: “Yes, I speak MCP.”
---
Step 2: Tools List
Next, Cursor requests a list of available tools by calling tools/list. This triggers handle_tools_list(), and your server responds with the search_designs action, plus its schema (which requires a query parameter).
{
  "tools": [
    {
      "name": "search_designs",
      "description": "Search for designs by title or description",
      "inputSchema": { "type": "object", "properties": { "query": {"type": "string"} }}
    }
  ]
}
At this point, Cursor knows the right way to fulfill the request “search for a dashboard” is to use search_designs.
---
Step 3: Tools Call
Cursor turns the user’s prompt into a tools/call request with {"query": "dashboard"}. This invokes handle_tool_call(), which delegates execution to search_designs(). That function searches the demo dataset (get_designs()) and finds a match: Modern Dashboard Layout
{
  "content": [{
    "type": "text",
    "text": "Found 1 design(s) matching 'dashboard':\n\n**Modern Dashboard Layout** (ID: design_123)\nDescription: A clean, responsive dashboard with sidebar navigation\nCreated: 2024-01-15T10:30:00Z\nPrompts used: 1"
  }]
}
Cursor then reformats this into natural language, telling the developer inside their IDE:
“I found 1 design matching ‘dashboard’: Modern Dashboard Layout — a clean, responsive dashboard with sidebar navigation.”
And that's how I got my first MCP skeleton server to work with Cursor!
Conclusion: Why MCP Matters
Thank you so much for reading!
At its core, the Model Context Protocol is about one thing: making AI tools truly useful by embedding them directly into our workflows. Instead of sitting on the sidelines as question‑and‑answer bots, assistants powered by MCP can take action, discover functionality, and bridge the gap between the tools we use every day.
In this article, we built a simple MCP server using Flask. We exposed a basic search_designs tool, connected it to an AI assistant, and walked through how that tool could be used in practice to support design-to-development handoffs. While our demo was lightweight (just searching a small dataset of prototypes), the lesson is that with MCP, you can grow this skeleton into something much more powerful: querying databases, fetching code for these designs, applying design system styles, or even generating deployable applications with a few requests.
Key Learnings that I took away from this project
- MCP is a bridge, and not “just another API”: MCP introduces capabilities, structured tool descriptions, and a conversational flow that can make our workflows much more efficient
- Simple is enough to start: A lightweight Flask app with clear helper functions for initialize, tools/list, and tools/call is a functional MCP server foundation. Building it from the ground up (instead of using a python module like FastMCP) really helped me wrap my head around how this exciting tech works!
- Focus on user value, not polish: Prototypes don’t need to be pixel‑perfect or fully branded from the start. They only need to capture functionality and layout. MCP lets the AI handle refinements later, freeing designers to focus on what really matters: The User Experience.
- Extendability is the real magic: This MCP server makes it easy to scale and bolt on new functions as tools, thereby enhancing the capabilities of any particular AI Agent you want to create.
MCP matters because it changes the role of AI from “helpful sidekick” to active collaborator. It enables workflows where designers, developers, and assistants are working together continuously. And more importantly, it gives you as a builder a clear format to apply: start small, expose a single useful function, and then iterate by adding tools that make sense for your product or agentic service.
If you want to bring your company's services into the MCP ecosystem, this is an easy way to do it. Build an MCP server, register its tools, and let AI Agents discover and use your functionality in context. What we covered here is just a starting point...the next step is all yours.
Good luck with building your MCP Server and Happy Building!
About the Author
Hi, my name is Gareth. I’m the creator of prototypr.ai and the founder of a startup called Data Narrative. If you enjoyed this post, please consider connecting with me on LinkedIn.
If you need help with full stack data initiatives or are looking into building Generative AI applications, please feel free to reach out. I love building GenAI and full stack measurement solutions that help businesses grow.
Until next time!
About prototypr.ai MCP
Thanks again for taking the time to read this article! If you are interested in testing out prototypr.ai's Beta MCP server, please become a member! It has recently launched to Plus and Pro members of the platform and introduces the ability to search for designs and get code for a specific design. Perfect if you want to hand off a prototype to an AI Developer using Cursor! Please check out prototypr.ai MCP Tools for more information about how you can integrate with MCP.
If you have any feedback or capabilities you would like to see as part of the prototypr.ai MCP, please feel free connect with me via LinkedIn or through customer support in the app.